All posts by The Student

Summer Fruit Salad Dessert

Hello!

It is now summer, which means I may actually have time to do some cooking again!

Tonight, I am going over to a house of some friends for dinner, and I’m bringing (in their words) a “salad-dessert combo”. (I gave them a list of things I would be very happy to bring, including “some combination thereof”, which then translated into a combined salad-dessert. Yup. Head’s up: Don’t try to take things too literally with me, because I will respond in kind.

So for dessert, we’re having a frozen fruit salad with a cinnamon-lemon “dressing”, and canned whipped-cream.

frozen fruit salad with a lemon dressing / glaze
It’s frozen. It’s fruit. It’s got “dressing.” (Whipped-cream not shown.)

I’ve sampled it, and it’s gonna be good. 😀

Ingredients

  • Fruit:
    • 1/2-1 1/2 C Strawberries
    • 1 C Blueberries
    • 1-2 Bananas
    • Frozen Cherries
  • Glaze / “dressing”
    • About 1 Tblsp honey
    • About 1-2 tsp lemon juice
    • About 1 tsp vanilla
    • cinnamon

Make the “dressing” / Glaze

In the bowl you will be mixing and freezing from:

  1. Pour in the honey. Make sure the honey is liquidy. Mine solidifies… frequently. So, in order to use it, I needed to stick it in the microwave for a few seconds at a time until it was liquid again. I do things in about increments of 15 seconds at power level 5 at first, and then 7 second intervals to get rid of the lumps. Note that you should do this step first.
  2. Add the lemon juice. Stir a bit.
  3. Add the vanilla. Stir more.
  4. Add cinnamon. Stir vigorously or whisk until completely smooth.

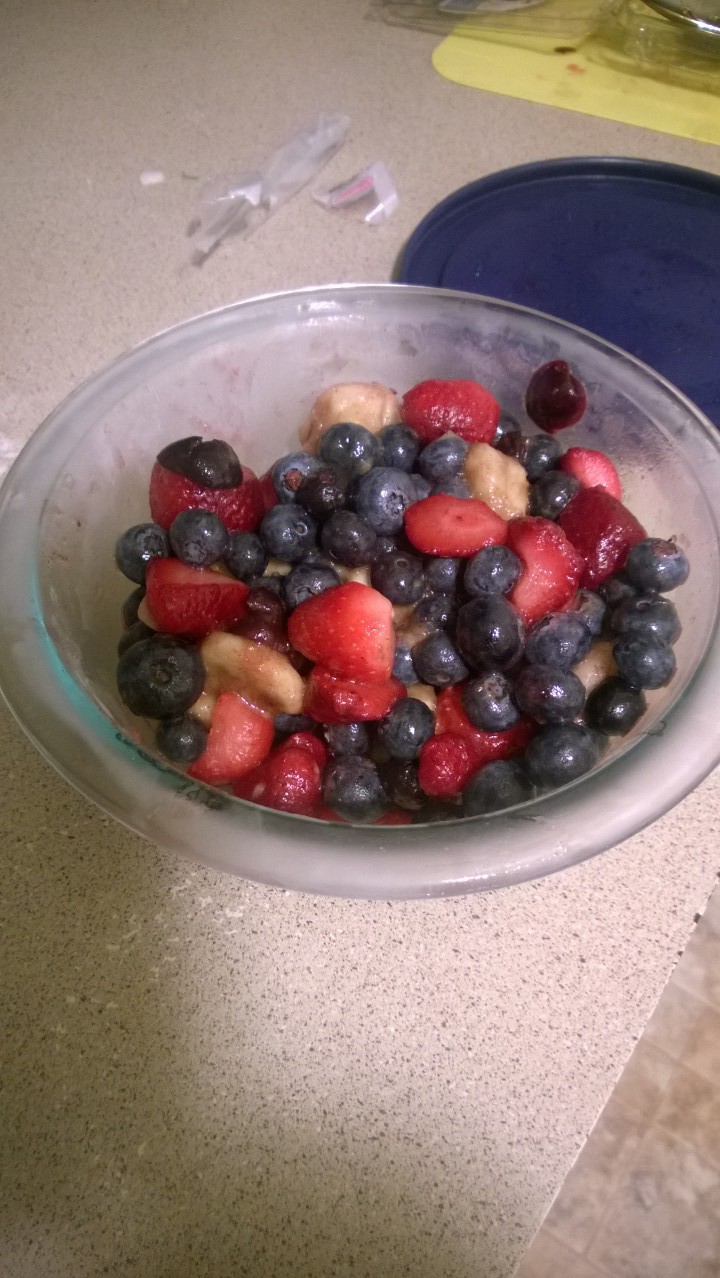
Making the fruit salad

  1. Slice the fruit into bite-size pieces
  2. Add the fruit into the bowl with the “dressing”, one type of fruit at a time
  3. As you add the fruit, stir it in with the glaze.
  4. Sample as needed to ensure that the fruit and “dressing” really go together. 😉
  5. Freeze for a while
  6. I have not done this yet, but stick in refrigerator for probably about an hour before ready to serve. Or bring it out for a few minutes, and let it sit in the summer heat, so that it can partially thaw.
  7. Divide into individual portions, douse with whipped-cream, and enjoy.

Make anything more delicious in 1 easy step

Hello, readers! Unfortunately, the name didn’t show up quite properly. This post is actually supposed to be titled:

How to make anything more unhealthy delicious in one easy step

And that step?

1. Add butter.

If you want to go even further:

2. Add cinnamon, brown sugar, vanilla, and nutmeg (for desserts), or onion and garlic (for non-desserts. Obviously.)

Another way to make savory things more delicious in 1 easy step: add ranch dressing.

Yup. That’s about it.

Enjoy!

Just showing off…

Hello, readers!

So, no recipe today… but I GOT A NEW TOY!!! It’s a silicone mini loaf pan, and I’m basically in love. It’s a very lightweight 100% silicone (it passed the “pinch test”) mini-loaf-sheet-thingy. And it is the best non-stick silicone I have ever used, I kid you not. Probably because it’s so thin and flexible.

Or maybe I actually put enough oil in. Whatever.

But yeah. I kindof went a little overboard with the baking (and eating baked goods) today…

Mini loaves of two types of bread and a mini-loaf silicone sheet
Mini Loaves of various sorts.

The two types of bread pictured include a normal (for me) variation on a yeast bread (except, you know, with that leftover nut flour I made, a bit of flax, and estimation on the salt…). The others are a slightly sweeter bread. I got inspired by an idea I saw for a strawberry quick-bread that used strawberry puree, and so I mixed up a bit of a berry puree thingy with some water and milk to get the proper fluid amount that the beer-bread recipe called for. I also added a handful of dried cranberries.

I baked the berry-bread at about 350 (I think, maybe 375) for about 15-20 minutes, or until it looked done. (I know. So helpful…)

The result is delicious. I have had waaaay too many of those mini-loaves today.

I’m definitely going to make some mini beer-breads with this new pan! And other quick breads. And normal breads. And who knows what else, because this mini-loaf-sheet-thingy is fantastic. (California Kitchen, by the way, if you’re interested.)

So, yeah. Have a great day!

Heartier Beer-Bread Recipe

Hello!

Recently, my apartment-mate hosted a BYOB party thing, and for some reason we got to keep the leftover beer. That left us with a very full fridge. So, I decided to turn some of that beer into bread! (Yay free beer!) I originally made one using this recipe.

Then today, I decided to modify it a bit to make it healthier. Or at least, “heartier”. (Yes, I’m making beer healthier. No, that’s not the normal direction I go — usually I successfully make health-foods unhealthy/tasty.)

So, here’s the recipe.

Nutty/Grainy Beer Bread

Ingredients:

  1. 1/2 cup mixed almond/pecan flour. (I used my lovely, lovely VitaMix Dry Container to create this one. I put a 1/4 cup each of Almonds and Pecans into the blender. That ended up making at least 3/4 cup of flour, probably closer to 1 cup.)
  2. 1/4 cup original oatmeal.
  3. 1 1/2 cups whole wheat flour, spooned into the measuring cup.
  4. 1 C white flour, spooned into the measuring cup.
  5. 1 TBSP baking powder
  6. 1 tsp salt
  7. 1/4 C sugar
  8. 1 12-oz container of beer. (I used an Amber Ale.) (Minus about a sip…)
  9. About 2/3 stick of butter (melted)

Instructions

  1. Preheat oven to 375 F.
  2. Grease a loaf pan thingy
  3. combine dry ingredients
  4. Gradually pour in beer. (I did it about 1/3 at a time.)
  5. Mix until flour is moistened. Do not overmix– it’s supposed to be lumpy.
  6. Pour into greased loaf pan
  7. Pour melted butter over the dough
  8. (Optional) Sprinkle more nut-flour & oats over the top
  9. Bake for 45-60 minutes, until golden brown
  10. Let cool for about 15 minutes
  11. Enjoy!

Random note…

I have yet to figure out how to get the loaf out of the pan without the bottom sticking. I’m wondering if cooking it for less time is the answer, but I don’t know. I’m not actually complaining too much, since the crust is one of the best parts, and therefore if it separates from the loaf I can have the bottom crust all too myself! BWAHAHAHA! But, yeah. I thought you’d want to know.

A beer bread, with a nuttier base to it.
This is a new favorite bread recipe of mine. 🙂

Easy Vegetable & Rice Soup

Hello, readers!

I have recently been using variations on a type of soup for my dinners. And sometimes lunches. Because I’ve made a very easy, inexpensive recipe that’s fairly flexible, fairly tasty, and fairly filling.

Easy Soup Recipe

I love this recipe, in large part because it’s inexpensive in both money and timePrep time: about 5-10 minutes, tops. Cooking time: 20-45 minutes. Total: less than an hour until you get a hearty, delicious soup. 🙂

Necessary Ingredients (makes about 4-6 servings.)

  1. 6 cups of water (free)
  2. 2 TBSP of either chicken or beef “Better than Bouillon” (BtB) (About $1 if you get it from Amazon, so call it about $.2/serving.)
  3. 1 small can of tomato paste ($.3? So, $.07/serving?)
  4. 1 onion ($.50-$.60? I dunno… $.10-$.12/serving)
  5. 2 carrots ($.2, so $.04/serving)
  6. 2 celery sticks ($.2? $.04/serving)
  7. 1/2 C rice (Negligible.)
  8. Beans (Optional. I use black beans or pinto beans.) ($.95, so $.2/serving)
  9. (optional) some almonds, pecans, or (I haven’t tried this one yet) walnuts. (This makes it a bit more expensive. But I use about 1/3 of a cup for the entire recipe, so it’s still not that bad.) (I am not going to include the price here.)

Optional spices

The prices here are mostly negligible.

  1. Freshly ground pepper to taste
  2. Cinnamon to taste
  3. Prepared Mustard (I use Beaver’s Hot and Sweet when I use the beef BtB)
  4. Parsley to taste
  5. Basil
  6. Oregano
  7. Salt (not needed with normal BtB)
  8. Cheese. (Either white or cheddar, or white cheddar.) ($.5 or $.6/serving.)

Total cost: about $.65/serving. (Not including the price of any bread you choose to have with it. But that’s also fairly inexpensive, and probably costs no more than about $.10/serving. So, call it about $.75/serving. Not bad!)

Directions

  1. In a soup pot, bring 6 C of water to a boil
  2. While water is boiling, slice onions, carrots, and celery. Add to the water at any point in time.
  3. When water is boiling, add the 2 Tbsp of BtB, the spices, and the can of tomato paste. Stir until BTB is dissolved, and tomato paste is well incorporated
  4. Add the 1/2 C rice, stir.
  5. Reduce heat as much as possible, as though you were cooking the rice. Cover, and let sit for at least 15-20 minutes, stirring occasionally to keep the rice from sticking.
  6. (Optional) After about 15 minutes, heat the beans you will want in your soup.
  7. (NONOPTIONAL). When soup is done, serve into bowl. (If including beans in order to get the complete protein, or whatever it is, combine the two sets now.)
  8. (optional) If using cheese, now’s a good time to add it in. My personal favorite combo is a combination of the “babybell” cheese, mozzarella, Parmesan, and Romano.
  9. (Optional) Heat some french bread (or other starchy bready thing) to go with.
  10. (completely nonoptional) Enjoy. 🙂

sweet things that I have no clue what they were

Hi everyone!

Sorry for the long delay. I meant to write something over break, but break happened. (In related news, I’ve now beaten both Portal games…)

Yup.

Anywho, I experimented with a recipe, and I did not expect it to turn out as well as it did, so I have no pictures.

Or real recipe.

Oh well, here it goes. (Please excuse the “ish”es, and all those good stuffs.)

I have no clue what they were sweet experiments

(But they were kindof like a cross between a pound cake, candied pecans, biscuits, and muffinish type thingamabobbers.)

Yes, you read that “tagline” correctly. Unless you read something about “murder” or “unicorns” or something else not actually in the tagline. So maybe you didn’t. And I think I’ve now used enough space to put in the second h2 tag for ingredients, and not completely throw you off visually.

Ingredients (makes 4ish)

  1. A bit more than 1/4ish Cup flour
  2. A bit less than 1/4ish Cup sugar
  3. 1 TBSP butter, plus another tbspish butter, separated.
  4. 1/4 tsp salt
  5. 1/4 tsp baking powder
  6. 8-16 pecans
  7. about 1stp-ish of brown sugar
  8. 4 shakes(ish) of cinnamon
  9. 2-4 TBSP milk

Note: I used a silicone muffin-tin-thing, and made them “upside-down cupcake” things.

Directions

  1. Preheat oven to 350ish.
  2. Mix the flour, sugar, salt, baking powder, and 1 tbsp butter in a small mixing bowl, until flaky. Don’t mix too much.
  3. Add the milk, until you get a slightly sticky batter. Slightly overmix here to get a more chewy consistency. At least, I think that’s what happened. Somebody with time should run an experiment with overmixing / not overmixing, and let me know. 🙂
  4. Melt the remaining tbsp butter, and pour evenishly into 4 of your muffin-pan things.
  5. Shake some cinnamon over the butter, and add a pinch (or more, if desired) of brown sugar to each one.
  6. put 2-4 pecans into the base of each cupthingy.
  7. Spoon batter into the doohickies.
  8. Bake until the batter starts to not stick to the sides of the pan.
  9. Remove from oven
  10. Make a cup of coffee (nonoptional.)
  11. Enjoy your “I-have-no-clue-what-the-heck-this-is” with your cup of coffee. (Also nonoptional.)
  12. Have a great day/night/week/whatever! (Optional.)

Mocha Meltdown Madness

Hi, readers!

It’s getting on towards the end of the quarter for me. At some point I’m going to need to do a series of posts on the interesting snacks I’ve experimented with, but I don’t have the time.

I do have the time, though, to share a fairly quick coffee drink recipe with you. It’s a white-chocolate, chocolate, peppermint drink I’m calling “Mocha Meltdown Madness” for a few reasons.

A) Alliteration. Duh.

2) Chocolate. I’m getting towards (2ards? Meh) the end of the quarter, which means that chocolate is required to prevent / help with “meltdowns.” Also, chocolate melts. So, it’s a pun.

last) Madness. Why didn’t I think of this before? Why is the end of the semester so busy? Why are all these ingredients in the same cup tasting so good? Madness, I tell you!

Mocha Meltdown Madness

Ingredients

  • 1-2 ounces of milk (per 10 ounces of coffee, up to you.  It depends on the size of your mug.) Cream would be better, but hey- grad school budget. (negligible price / not worth the time of estimation.)
  • 10 ounces of coffee, thereabouts. (About 30 cents, according to my Dad’s calculations. Or free, if you get someone else to buy the coffee for you.)
  • About 1 TBSP white chocolate chips (negligible cost)
  • About 1 TBSP bittersweet chocolate chips (negligible)
  • 5-6 drops peppermint extract / a bit less than 1/4 tsp. (If you don’t like peppermint that much, even though it helps with concentration so it’s practically a necessity / healthy for students, use less.) (negligible)
  • A small capful of vanilla (optional). Or a big capful. But that’ll change the flavor. Obviously.

Directions

  • Heat milk, either in microwave or saucepan/skillet/stovetop-safe-thingy until it is hot enough to melt your chocolate
  • Add the chocolate chips, peppermint, and vanilla
  • Stir/whisk together until blended
  • Stick in microwave again, to ensure that your coffee stays hot for as long as possible. I use about 45 seconds on 20% power. Or use whatever setting you would for melting chocolate.
  • Pour coffee into mug, stir again.
  • (Optional: If you have whipped cream, put on top. Peppermint sprinkles would make a nice garnish. However, since this is a recipe by a graduate student, the original recipe does not have anything like that. After all, I choose not to afford cream on a regular basis. So, no whipped cream… for a regular thing.)
  • Test it. If necessary, or if merely desired, add more chocolate chips. White chocolate chips makes the drink sweeter, whereas bittersweet makes it more, well, chocolatey.
  • (nonoptional) Enjoy.

Total price? Probably less than a buck. But does it matter? Nope. It is SO. WORTH IT.

I hope you enjoy!

REALLY good baked chicken meal

Hi there!

Once more I made a chicken dinner thingy. (Big surprise, right?)

Chicken, Buttered Rice, Spinach, and Semi-Pita Bread.
Chicken, Buttered Rice, Spinach, and Semi-Pita Bread. Yum!

This one took a bit of time to prepare. As in, I marinated the chicken all day. So, plan on that, if you wish.

Other Things

Spinach

Ingredients

  1. A handful of spinach. More than you think you want, and it’ll still be less. I used probably about $0.20 worth of fresh spinach.
  2. 1 Tbsp Onion (negligible cost)
  3. About 1/2 tbsp butter (my roommate has non-stick pans that I get to use. 🙂 The butter is for flavor.) (about $0.05).

Directions

  1. Cook onions in butter until onions are tender
  2. Put the spinach in until cooked and heated.

Easy, right?

Rice

Cook according to directions. Add a bit of salt to the water, and then after it’s done, add about 1 tsp of butter. Probably about $0.25. This is a totally and completely random guess, though, and probably waaay overestimated.

Pita

I used this recipe. Use a bit less salt than it calls for, though. By probably 1/8-1/4. (I made it according to a half-recipe, and baked it in the oven.) According to my rough calculations, the pita cost about $0.15. Probably a bit less.

Chicken

Ingredients

  1. About 1/4 LB chicken, or one chicken piece like the one shown above. (About $0.55)
  2. Almost 1/2 cup milk (about $0.15)
  3. 1/2 TBSP lemon juice, plus a little extra for later (negligible cost.)
  4. 2 cloves garlic (I really don’t know… I misplaced how much the bulbs cost. Probably quite negligible, though.)
  5. 1/2 tsp Salt + a bit. (Negligible.)
  6. Parsley, Basil, Oregano (Negligible)
  7. 1/2 TBSP Oil (negligible)

Directions

In a small bowl, mix together the milk and 1/2 TBSP lemon juice. Let stand for at least 5 minutes. This makes fake buttermilk.

Then, combine the fake buttermilk with the salt, garlic, parsley, basil, and oregano. I used more parsley than basil, and more basil than oregano. Basically, until it looks seasoned…

Next put the chicken into the marinade and coat it. Sprinkle a little more salt on. (I’d heard that it helps pull the marinade/stuff in. And it seemed to work!) Let it sit in the refrigerator for the day.

If you can, you might want to turn it occasionally throughout the day and re-coat. I happened to come home early today, so it worked for me, but it shouldn’t be necessary.

When you’re ready to cook the chicken:

  1. Preheat the oven to 425 f.
  2. Transfer chicken (and about 1TBSP of the extra marinade) to a small casserole dish to cook in.
  3. Put the 1/2 TBSP oil into the pan, drizzling it over the chicken, and then into the excess marinade.
  4. Turn the chicken a couple of times to coat.
  5. Bake for about 12 minutes. Check the readiness, and (in theory) turn over the chicken. (I forgot to turn it over… I knew there was a reason I underdid the amount of time! Oh well…)
  6. Bake for about another 7 minutes. However, because of the moisture you’ve pulled into the chicken, an extra minute or two won’t hurt it. At least, it didn’t hurt mine, so yours should be good.

There you go!

Total cost of the meal: $0.70 for the chicken, $0.15 for the bread, no more than $0.25 for the rice, and about $0.25 for the spinach. Total cost: $1.35. Maximum. Not bad, right?

My Grape Juice Turned Into a Smoothie

Hi readers!

So. I ended up going to a highly aerobic dance club tonight. (Seriously, I completely understand how some types of dance can burn about 500 calories an hour.) (And no, it wasn’t Zumba- it was Charleston. A WHOLE lot of fun!)

And after I got back, I thought that I really wanted grape juice. After all, I’ve got some frozen grapes in the freezer and a vitamix. Shouldn’t be too hard, right?

Unfortunately, ingredients just kept on popping up their heads saying “ooh, put me in! I’d be great!”

So the end result looked like this:

A fruit smoothie that was originally supposed to be grape juice.
Uh, “Grape Juice!” Yup, sure… 😀

And it’s REALLY, REALLY GOOD. 

So, here’s the recipe for:

Not Quite Grape Juice… at all

Ingredients

  1. 3 jumbo ice cubes (minimal charge)
  2. About 4-7 frozen strawberries (No more than 1/8 of a $2.00 bag, so about $0.13. Tops. Probably close to 7-10 cents.)
  3. About 6 frozen grapes (minimal charge.)
  4. About 1/4-1/3 Cup Milk (Maybe 5 cents?)
  5. (Optional) About 1-2 TBSP half & half (Maybe 5 cents?)
  6. A splash of vanilla (minimal)
  7. 1-2 tsp honey (MAYBE $0.05?)
  8. A shake of cinnamon (minimal)

Total cost: absolutely no more than $0.30. Probably much closer to $0.10. So, basically negligible. Especially if you already have the ingredients on hand. 🙂

Directions

  1. Start off by planning on having grape juice.
  2. Turn that idea into strawberry-grape juice.
  3. Realize you have milk, and could make something icecreamish
  4. Scratch the ice cream idea, because you want a beverage
  5. Add the ice, strawberries, and grapes into the vitamix
  6. Add the milk and half & half anyways, and decide to turn it into a smoothie
  7. Realize that vanilla would go nicely
  8. Add said vanilla
  9. Go, “Ah! I can make this ‘healthy’!” and add a shake or two of cinnamon
  10. Realize that both the cinnamon and vanilla will need sweetening
  11. Put in a bit of honey
  12. Blend until smooth

Serving: About 1 Cup.

Simpler Directions

  1. Put ingredients into the vitamix
  2. Blend until smooth
  3. Enjoy
  4. Or don’t. Really, it’s up to you.

I hope you have a tasty drink/smoothie/thingy!

EXCELLENT baked biscuit-breaded chicken strips

Hi there!

Tonight I did a fair bit of pre-cooking for the week. (I took the thawed part of a couple of huge chicken breasts, and turned that into chicken strips which I then breaded and stuck in the oven.) I tried one of the strips, and I really like the way it turned out!

Biscuit-breaded Baked Chicken

I’m afraid I don’t have time to do the cost analysis, but I’m quite sure it’s a fairly inexpensive recipe. I’d guess probably no more than $1.50 a serving. It took a bit of time, since I made my own biscuits from scratch, but from what I’ve tried it’s sooo worth it. So, for any breaded chicken recipe that I do, there are generally about

three main steps

  1. Preparing the breading/coating
  2. Preparing the chicken to bake
  3. Baking the chicken.

And for this, there are three main things that get mixed together in step 2. They are

  1. breading/coating
  2. liquidy-stuff
  3. chicken

The chicken requires minimal preparation. Cut it into appropriately sized strips or chunks. Really, it’s entirely up to you. It’s in the liquidy-stuff and the breading/coating where things get fun!

Breading/Coating/Dry-Stuff

For this, I first baked some biscuits this afternoon. I pretty much used the Allrecipe Kentucky Biscuits Recipe, except that since I didn’t have buttermilk, I used a substitute.

Buttermilk Substitute

Ingredients
  1. 1 cup minus 1 TBSP milk
  2. 1 TBSP lemon juice

Mix them together, and let them stand. I found it online somewhere, and I’m afraid I’ve lost the link… I’ve been told that buttermilk is what makes biscuits flaky, and that this achieves the effect. The biscuits were flaky, so I’m guessing it worked.

Note: Even though the biscuit recipe calls for only 3/4 cup buttermilk, make the whole cup of substitute. You’ll use it later.

But back to the breading/stuff. I used a majority of my freshly baked biscuits (since they were a bit more bland than I wanted) and turned them into breadcrumbs. I’d say I probably used about 1/2-2/3 of the biscuits, and made somewhere between 1 & 2 cups of crumbs.

So, actually, here are the

Breading/Coating/Dry-Stuff Ingredients

  1. Biscuit crumbs. (1-2 cups.)
  2. salt to taste
  3. 2 cloves garlic
  4. parsley
  5. basil
  6. More parsley
  7. oregano

Basically, mix all those up. Season to taste. I’m afraid I can’t help you with the precise amount of the ingredients, since I seldom actually measure herbs… I used probably about a large pinch of each. (A very large pinch for the parsley.)

The liquidy-stuff you dip your chicken in

Ingredients

  1. 1/4 cup Buttermilk Substitute
  2. Some oil

Mix together in a bowl large enough to fit your chicken slices into.

Bread your Chicken

I think the technical term is called “dredging”, but I’m probably wrong on that, and I don’t have time to Google it.

Basically, take your chicken, dip it in your liquidy-stuff and let the excess drip off, then coat it in your biscuit crumb mixture.

If you have leftover liquid and breadcrumbs, do it again. This gives you extra thick breading.

Bake your chicken

For the size of strip that I had, I put them in the oven at 350 for 15 minutes, took them out, turned the oven up to 375, and put the chicken back in for another 10-15 minutes.

I hope you enjoy!